Scope help
-
R-Dhillon
- Almost at nirvana

- Posts: 138
- Joined: Thu Jun 26, 2008 1:18 pm
- Location: Ludhiana
Scope help
Hi everyone,
I took out my bushnell 3-9x 40mm sportman riflescope and noticed that while rotating the magnification ring from 3x to 6x, I really have to force it to move but after 6x, it revolves easily. I used HW-40 quite liberally but it did not do any good. What can be done about it and how can I get it repaired? I dont even know whats wrong with the stupid thing... Please help asap..
Regards,
R.Dhillon...
-
Mack The Knife
- We post a lot

- Posts: 5775
- Joined: Mon May 22, 2006 6:23 pm
Re: Scope help
This is a HW40... 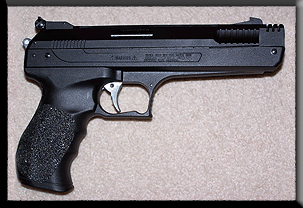
...and this is WD40...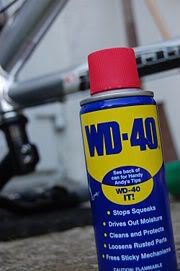
I do hope you used the latter...
If it's a new scope, then its possible it will loosen up after some use or else it's quite possible the recoil from your airgun has knackered the scope. TenX had an almost similar problem recently.
By the way, I don't think it is a good idea to use WD40 as it could creep inside and coat the glass elements.

...and this is WD40...

I do hope you used the latter...
If it's a new scope, then its possible it will loosen up after some use or else it's quite possible the recoil from your airgun has knackered the scope. TenX had an almost similar problem recently.
By the way, I don't think it is a good idea to use WD40 as it could creep inside and coat the glass elements.
-
R-Dhillon
- Almost at nirvana

- Posts: 138
- Joined: Thu Jun 26, 2008 1:18 pm
- Location: Ludhiana
Re: Scope help
lol...I meant the WD-40...can anything be done to the scope?
-
Mack The Knife
- We post a lot

- Posts: 5775
- Joined: Mon May 22, 2006 6:23 pm
Re: Scope help
RD,
My experience in this field is marginal at best. However, please answer the following:
1) Is the scope a new or old one?
2) Did the scope exhibit the described symptoms from the start or has the problem surfaced after some use?
3) Was it used on a spring-piston air-rifle? If so, which one?
4) If it's an Indian air-rifle did you install a spring that was way to powerful for it?
5) Are there any more details you can provide?
-
R-Dhillon
- Almost at nirvana

- Posts: 138
- Joined: Thu Jun 26, 2008 1:18 pm
- Location: Ludhiana
Re: Scope help
Mr.Mack The Knife,
1) The scope is just two months old.
2) I noticed the problem just yesterday after I took it out to use.
3) It was used on an IHP .22. I have a John Knibbs mainspring installed in it. (bought it from "ai")
4) I dont know if the spring is way too powerful but it is supposed to give me over 12 ftlbs of muzzel energy.
(Supposed to because havent checked on a chronograph. donr know where to find one)
5) Once while my cousin was plinking with it, he did not tighten the rear ring to the dovetail and the recoil of the gun displaced it from its position. But it was still fine after the incident and worked well for the following two days. Packed it and stored it since yesterday and realised this problem.
Is it repairable?
Would like to wish you a very prosperous and Happy Diwali.
Regards,
R.Dhillon.
-
Mack The Knife
- We post a lot

- Posts: 5775
- Joined: Mon May 22, 2006 6:23 pm
Re: Scope help
I am pretty sure it is repairable but it will have to be someone with knowledge of optical instruments in your area. If you cannot find someone suitable, then perhaps I could make a suggestion or two but cannot guarantee success. Infact, it could make things worse.
I wouldn't bother sending it to Bushnell as I have personal experience of their poor customer service.
Happy Diwali to you as well.
Mack The Knife
I wouldn't bother sending it to Bushnell as I have personal experience of their poor customer service.
Happy Diwali to you as well.
Mack The Knife
-
R-Dhillon
- Almost at nirvana

- Posts: 138
- Joined: Thu Jun 26, 2008 1:18 pm
- Location: Ludhiana
Re: Scope help
A friend just advised me to go to a shop that repairs cameras etc...but jus couldnt find any nearby. You think a camera lens repairman could do the job?
Regards,
R.Dhillon.
Regards,
R.Dhillon.
-
Mack The Knife
- We post a lot

- Posts: 5775
- Joined: Mon May 22, 2006 6:23 pm
- dev
- Old Timer

- Posts: 2636
- Joined: Wed Jun 14, 2006 5:16 pm
- Location: New Delhi
Hi,R-Dhillon";p="57866 wrote: A friend just advised me to go to a shop that repairs cameras etc...but jus couldnt find any nearby. You think a camera lens repairman could do the job?
Regards,
R.Dhillon.
My two cents is that you just ignore the jerk or roughness while shifting between 3X or 6X etc. Keep it at a magnification that works for u and keep using it. Maybe on a better air rifle
Dev
To ride, to speak up, to shoot straight.
-
TenX
- Veteran

- Posts: 1902
- Joined: Sun Sep 30, 2007 3:19 pm
- Location: Bangalore, INDIA
- Contact:
Re: Scope help
Scope Repair Update....
With some free time, and waiting for the Bluing liquid, I decided to have a second look at my scope, which incidentally had the same
problem of the magnification ring not moving, and one of the rear parts had skipped a thread.
I was trying to get the scope to US and have it checked/repaired by Bushnell, but I did not get any response from them for the emails
sent. Furthermore, the cost of shipping to US was more than the cost of the scope that I bought it for, and hence, I had nothing to lose
with a little R & D.
So, what I did was get the proper tools to completely dismantle the scope parts and decided to check what I might find wrong. I looked
into some of the scope parts and diagrams on the web, and as I started to dismantle the scope, I got a pretty good idea what I was
removing and how it works.
I also checked with the two domestic hands at home. and one of them mentioned that a nephew who visited my house in my absence
took the liberty of 'checking' the scope that was fitted onto the HW77K. He seems to have injured the scope, because the maid did
say she heard a banging noise, after which he immediately kept it back. (No more guns in the house unless I get a lockable gun rack!)
After carefully removing the parts, and successfully breaking the cross hairs out of sheer sweat-based accident (when I dropped the
screw driver right on the cross hair, I was now faced with two problems:
1. The magnification would not work
2. The cross hairs were kaput!
Bracing my courage with a couple of beers, I continued and removed the rest of the parts carefully. I was challenged by a particular
rear fitting that would just not turn. I was a little afraid to spray WD40 directly onto it, and then decided to apply a small bit using a
cloth. In the mean time, an ably well built friend of mine came home to visit me ... and what are friends for
After letting him know exactly what I wanted, he removed the piece in the first attempt. Now all I had to do was remove the remaining
parts, find out what makes the magnification ring immovable, fix it, and make new cross hairs.
The cross hairs had me thinking for a while, when I thought I would use thin copper strands from electrical wire. But they were too
delicate and the slightest bend or pressure made them go all awry. It was time for my dogs' pee and they were running all around me.
A thought struck and I plucked two strands of hair from their tail, which wa straight and long enough. They matched the leftover of the
original cross-wires in size - thickness (approximately) and color. With a little bit of super glue, the cross hairs were placed, and it
looks pretty wkk now. If I had probably not mentioned it, it seems hard to find out
As I removed the magnification ring (Part A), one finds the first inner Magnification ring part (called Part B). In this, I found out that right
below where the screw of the magnification ring sits is a part that has a groove similar to this:
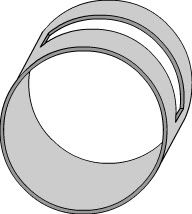
Notice the cut into part B. Right below this part is the actual magnification part (Part C), that has another groove like this:
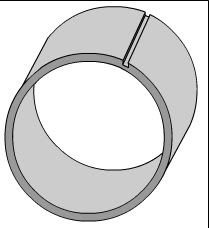
Within this groove sits the screw that passes thru the outer Magnification ring (Part A), then the first inner part (Part B) and finally sits well in the groove of Part C.
The screw is somewhat like this:
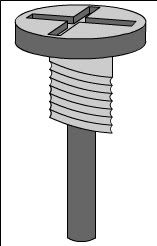
The first part of the screw which has the threading sits in the outer Magnification ring (Part A) snuggly screwed in. The rest of the small rod like protrusion goes in thru the Cut in Part B and then sits in the groove of Part C. Thus, when the outer ring is moced clockwise/counter-clockwise, the rod protrusion of the screw moves freely thru the cut in Part B and then actually moves the Part C in the same direction. The screw sits inside the two inner rings (Part B and Part C) like this:
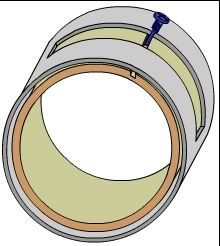
Note: the threading seen above is actually sitting well in the outer magnification adjustment ring (part A), which is seen on the outside, and used to control magnification
In my case, the cut in Part B had its shape distorted. That is, the distance between the length of the cut was not proper, and the center of the cut had moved in closer to the walls of each other. Boy, I sure am having a rough time explaining all this! This prevented the smooth flow of the screw-rod, and that was the problem. Probably, the boy much have struck the scope rear head to something, and the cut may have closed up.
I tried to use a screw driver to bring the gap proportionate all over, but the aluminium part would get back to its distorted state. FInally, after laying the odds, I decided to make the gap of the cut wider by actually using the screwdriver head to 'open' it up. It resulted in some rough edges, but the gap opened up enough for the screw-rod to move freely.
I then cleaned all the parts, blowed off the dust, cleaned the lens with a lens-cleaning solution, and fitted back everything. The scope now works as new , and boy, am I glad!
With some free time, and waiting for the Bluing liquid, I decided to have a second look at my scope, which incidentally had the same
problem of the magnification ring not moving, and one of the rear parts had skipped a thread.
I was trying to get the scope to US and have it checked/repaired by Bushnell, but I did not get any response from them for the emails
sent. Furthermore, the cost of shipping to US was more than the cost of the scope that I bought it for, and hence, I had nothing to lose
with a little R & D.
So, what I did was get the proper tools to completely dismantle the scope parts and decided to check what I might find wrong. I looked
into some of the scope parts and diagrams on the web, and as I started to dismantle the scope, I got a pretty good idea what I was
removing and how it works.
I also checked with the two domestic hands at home. and one of them mentioned that a nephew who visited my house in my absence
took the liberty of 'checking' the scope that was fitted onto the HW77K. He seems to have injured the scope, because the maid did
say she heard a banging noise, after which he immediately kept it back. (No more guns in the house unless I get a lockable gun rack!)
After carefully removing the parts, and successfully breaking the cross hairs out of sheer sweat-based accident (when I dropped the
screw driver right on the cross hair, I was now faced with two problems:
1. The magnification would not work
2. The cross hairs were kaput!
Bracing my courage with a couple of beers, I continued and removed the rest of the parts carefully. I was challenged by a particular
rear fitting that would just not turn. I was a little afraid to spray WD40 directly onto it, and then decided to apply a small bit using a
cloth. In the mean time, an ably well built friend of mine came home to visit me ... and what are friends for
After letting him know exactly what I wanted, he removed the piece in the first attempt. Now all I had to do was remove the remaining
parts, find out what makes the magnification ring immovable, fix it, and make new cross hairs.
The cross hairs had me thinking for a while, when I thought I would use thin copper strands from electrical wire. But they were too
delicate and the slightest bend or pressure made them go all awry. It was time for my dogs' pee and they were running all around me.
A thought struck and I plucked two strands of hair from their tail, which wa straight and long enough. They matched the leftover of the
original cross-wires in size - thickness (approximately) and color. With a little bit of super glue, the cross hairs were placed, and it
looks pretty wkk now. If I had probably not mentioned it, it seems hard to find out
As I removed the magnification ring (Part A), one finds the first inner Magnification ring part (called Part B). In this, I found out that right
below where the screw of the magnification ring sits is a part that has a groove similar to this:

Notice the cut into part B. Right below this part is the actual magnification part (Part C), that has another groove like this:

Within this groove sits the screw that passes thru the outer Magnification ring (Part A), then the first inner part (Part B) and finally sits well in the groove of Part C.
The screw is somewhat like this:

The first part of the screw which has the threading sits in the outer Magnification ring (Part A) snuggly screwed in. The rest of the small rod like protrusion goes in thru the Cut in Part B and then sits in the groove of Part C. Thus, when the outer ring is moced clockwise/counter-clockwise, the rod protrusion of the screw moves freely thru the cut in Part B and then actually moves the Part C in the same direction. The screw sits inside the two inner rings (Part B and Part C) like this:

Note: the threading seen above is actually sitting well in the outer magnification adjustment ring (part A), which is seen on the outside, and used to control magnification
In my case, the cut in Part B had its shape distorted. That is, the distance between the length of the cut was not proper, and the center of the cut had moved in closer to the walls of each other. Boy, I sure am having a rough time explaining all this! This prevented the smooth flow of the screw-rod, and that was the problem. Probably, the boy much have struck the scope rear head to something, and the cut may have closed up.
I tried to use a screw driver to bring the gap proportionate all over, but the aluminium part would get back to its distorted state. FInally, after laying the odds, I decided to make the gap of the cut wider by actually using the screwdriver head to 'open' it up. It resulted in some rough edges, but the gap opened up enough for the screw-rod to move freely.
I then cleaned all the parts, blowed off the dust, cleaned the lens with a lens-cleaning solution, and fitted back everything. The scope now works as new
Never Shave without a Blade
.......^___________________^
....../ '---_________________ ]
...../_==O;;;;;;;;_______.:/
.....),---.(_(____)/.....
....// (..) ),----/....
...//____//......
..//____//......
.//____//......
..-------
.......^___________________^
....../ '---_________________ ]
...../_==O;;;;;;;;_______.:/
.....),---.(_(____)/.....
....// (..) ),----/....
...//____//......
..//____//......
.//____//......
..-------
-
Mack The Knife
- We post a lot

- Posts: 5775
- Joined: Mon May 22, 2006 6:23 pm
Re: Scope help
Well done! 
The brass wire will also work. Infact, it has been taking the pounding of a 18.5 ft.lb. HW90 for close to a year now.
The brass wire will also work. Infact, it has been taking the pounding of a 18.5 ft.lb. HW90 for close to a year now.
-
TenX
- Veteran

- Posts: 1902
- Joined: Sun Sep 30, 2007 3:19 pm
- Location: Bangalore, INDIA
- Contact:
I was probably too enthusiastic to complete the repair work:)Mack The Knife Bana";p="58067 wrote: ...The brass wire will also work. Infact, it has been taking the pounding of a 18.5 ft.lb. HW90 for close to a year now...
Lets see how long the dogs hair stand. Once its broken, as time goes by, I guess I will try other options. I guess the next time, I will probably use silver wires for their malliability and ductility. Matter of fact, small knots could also be made on the wire which will act as mil-dots
Never Shave without a Blade
.......^___________________^
....../ '---_________________ ]
...../_==O;;;;;;;;_______.:/
.....),---.(_(____)/.....
....// (..) ),----/....
...//____//......
..//____//......
.//____//......
..-------
.......^___________________^
....../ '---_________________ ]
...../_==O;;;;;;;;_______.:/
.....),---.(_(____)/.....
....// (..) ),----/....
...//____//......
..//____//......
.//____//......
..-------
-
lazybones
- One of Us (Nirvana)

- Posts: 324
- Joined: Tue Oct 07, 2008 11:18 pm
- Location: bangalore
Re: Scope help
Great job TenX and crisply articulated, and illustrated, as well. You've given "Hair of the Dog" an entirely new meaning 
Ashok
Ashok
-
TenX
- Veteran

- Posts: 1902
- Joined: Sun Sep 30, 2007 3:19 pm
- Location: Bangalore, INDIA
- Contact:
I am sure I could have done much better..lazybones";p="58078 wrote: ...and illustrated,...
For example, the threading on the screw is reverse.. The 'cut' displayed is way too wide.. without the outer ring, it may seem pretty difficult for one to understand.... and lots more
Never Shave without a Blade
.......^___________________^
....../ '---_________________ ]
...../_==O;;;;;;;;_______.:/
.....),---.(_(____)/.....
....// (..) ),----/....
...//____//......
..//____//......
.//____//......
..-------
.......^___________________^
....../ '---_________________ ]
...../_==O;;;;;;;;_______.:/
.....),---.(_(____)/.....
....// (..) ),----/....
...//____//......
..//____//......
.//____//......
..-------
-
ai
Try Nylon. For example, the strands covering the elastic thread that keep socks from slipping. That'll give a very fine crosshair that will last.TenX";p="58076 wrote:I was probably too enthusiastic to complete the repair work:)Mack The Knife Bana";p="58067 wrote: ...The brass wire will also work. Infact, it has been taking the pounding of a 18.5 ft.lb. HW90 for close to a year now...
Lets see how long the dogs hair stand. Once its broken, as time goes by, I guess I will try other options. I guess the next time, I will probably use silver wires for their malliability and ductility. Matter of fact, small knots could also be made on the wire which will act as mil-dots


