The Importance of Trigger Control in AR shooting"
Posted: Thu Mar 06, 2014 2:56 pm
The Importance of Trigger Control in AR shooting
Most air gunners seem to be concerned about the power & accuracy of their guns not to mention adding on embellishments such as a scope, fancy cheek pads, 2 stage triggers, muzzle brakes and what have you!
All said & done our enthusiasm begins to deflate when one can’t get consistent accuracy even with those expensive international brands of pellets!
In my search for the answers to this enigma, I came across this wonderful & informative write-up by Brian Samson which I’m pleased to share with you…. I do hope this ‘eye opener’ will go a long way towards helping you to shoot accurately & enjoy your shooting!
CORRECT TRIGGER FINGER POSITION
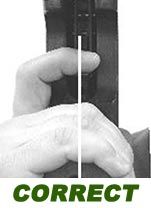
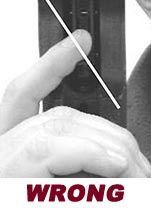
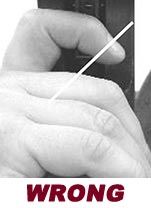
Keep your finger down the center line of the rifle. Always keep the middle portion of your index finger on the trigger because rigger control and follow-through are fundamental to accurate & consistent shooting.
It’s obvious that if you want to hit what you’re aiming at, you need to keep the gun as still as possible when you take your shot. While some shooting positions are more stable than others, there’s this issue of ‘Trigger Release’, the final act in shooting. So getting it right takes time and practice alone will get you the perfection in getting tight groupings consistently.


TRIGGER CONTROL
In essence trigger control is about firing your rifle without transmitting any movement to the gun. You definitely don’t want to be transmitting any sideways movement to your gun when you take your shot. The position of your hand and trigger finger is vital if you want to avoid pulling your shot to the left or right.
As everyone’s hands are different and stocks are made for the average shooter, you will probably need to experiment to find out what works best for you. The basic principle is that any movement that isn’t down the center line of your rifle is not a good idea. The lesser the muscles you use, the lesser is the chance you have of ‘pulling a shot’ or ‘snatching’ a shot. So you should try to find a hand position where the muscles in your hand are as relaxed as they can be, when the pad of your trigger finger is rested on the trigger blade.
Your trigger finger should be in a position that allows you to pull the trigger backwards down the center-line of the rifle. There must be no tendency for the finger to push the trigger blade to either the left or right. The hand must be positioned so that on releasing the trigger no lifting or pulling down on the rifle occurs.
With regards to grip pressure and thumb position, this is something that comes down to a personal preference & it’s best to experiment yourself to find out what works for you.
TRIGGER PULL WEIGHT
Most guns these days have a 2 stage trigger. This type has a degree of movement before a further resistance is felt - known as the first stage. Further movement beyond this point will release the mechanism - known as the 2nd stage.
2 stage trigger mechanisms usually have adjustment for length of pull and weight of the first stage and weight of the 2nd stage. Again, the trigger weight is a personal thing but try to avoid setting your trigger too light. Very light triggers run the risk of going off before you want them, which is very dangerous.
If you have a long length of travel on your trigger’s first stage, make sure that the pad of your trigger finger is at 90 degrees to your trigger blade when the 2nd stage is reached rather than at the start of the 1st stage.
TRIGGER RELEASE TECHNIQUE
There are two main methods of trigger technique that most shooters use.
1.When ready to commit to a shot, take up the 1st stage of the trigger until the 2nd stage is felt, then gradually increase pressure on the trigger blade until the shot is released.
2.When ready to commit to a shot, take up the 1st stage of the trigger until the 2nd stage is felt and increase and decrease pressure on the trigger blade in a ‘pulsing’ motion.
Either of these methods can work, again it’s something you should experiment with until you find what works best for you. The only part of your hand that should be moving when you take a shot is your trigger finger and your trigger should be set up to give a predictable and repeatable let off point.
THERE ARE SEVERAL MISTAKES THAT HAPPEN DURING TRIGGER RELEASE:
Snatching the trigger –
•That is a very rapid buildup of pressure, made even worse if the finger takes a ‘run at it’ i.e. approaches the trigger blade at speed.
•Pulling through the first stage quickly and hitting the second stage pressure and continuing through.
•Taking up the first stage then releasing the pressure a little before snatching at the second stage.
All of the above will transmit large movements to the gun as it fires.
FOLLOW THROUGH
The aiming and firing process does not end when the trigger is released. The process of maintaining the aim during and beyond the release of the shot is called follow through.
Follow through is of vital importance, particularly in air rifle shooting, because the action of the air rifle is quite slow. The trigger dis-engages the piston sear, the piston moves forward to compress the air which is released to accelerate the pellet up the barrel before it finally leaves the muzzle and only then is it free of the influence of the shooter. During this period (known as the ‘lock time’) if your aim is disturbed you might not hit your target.
There are several physiological reasons to follow through. When your crosshairs are where you want them to be, you release the trigger but the finger doesn’t move instantly. A reaction time delay of approximately 0.3 seconds occurs before your finger moves. Through this period the aim must be maintained.
Also, the gun is held in position by some muscular effort that must remain the same until the shot has left the rifle. Without follow through there is the chance that the muscles holding the gun might relax a fraction of a second early, before the pellet has left the muzzle, moving the gun and resulting in a poor shot.
Good follow through can be obtained by maintaining the aim of the rifle for about 1 second after trigger release. This is more than enough time to allow the shot to leave the rifle. It’s good practice to try to watch your pellet strike the target. It isn’t always possible to see your pellet in flight, but if you can see where you hit or miss on the target, then this will help with wind estimation and range estimation for subsequent targets on the course.
PUTTING IT ALL TOGETHER AND PRACTICING
For trigger control and follow through, you should try to avoid shooting at out of focus targets or targets that aren’t level. When shooting from a bench-rest or from the rested prone position use something to support your rifle to make it as stable as possible – remember to concentrate only on the trigger technique, breathing and follow through.
If you use the 25 yard target set-up make sure that the target paper is level, either by using a spirit level along the top edge of the paper or a plumb line along the side of the paper. A large part of accurate shooting is being able to learn from your mistakes…
HAPPY SHOOTING!!!
Briha
Most air gunners seem to be concerned about the power & accuracy of their guns not to mention adding on embellishments such as a scope, fancy cheek pads, 2 stage triggers, muzzle brakes and what have you!
All said & done our enthusiasm begins to deflate when one can’t get consistent accuracy even with those expensive international brands of pellets!
In my search for the answers to this enigma, I came across this wonderful & informative write-up by Brian Samson which I’m pleased to share with you…. I do hope this ‘eye opener’ will go a long way towards helping you to shoot accurately & enjoy your shooting!
CORRECT TRIGGER FINGER POSITION
Keep your finger down the center line of the rifle. Always keep the middle portion of your index finger on the trigger because rigger control and follow-through are fundamental to accurate & consistent shooting.
It’s obvious that if you want to hit what you’re aiming at, you need to keep the gun as still as possible when you take your shot. While some shooting positions are more stable than others, there’s this issue of ‘Trigger Release’, the final act in shooting. So getting it right takes time and practice alone will get you the perfection in getting tight groupings consistently.


TRIGGER CONTROL
In essence trigger control is about firing your rifle without transmitting any movement to the gun. You definitely don’t want to be transmitting any sideways movement to your gun when you take your shot. The position of your hand and trigger finger is vital if you want to avoid pulling your shot to the left or right.
As everyone’s hands are different and stocks are made for the average shooter, you will probably need to experiment to find out what works best for you. The basic principle is that any movement that isn’t down the center line of your rifle is not a good idea. The lesser the muscles you use, the lesser is the chance you have of ‘pulling a shot’ or ‘snatching’ a shot. So you should try to find a hand position where the muscles in your hand are as relaxed as they can be, when the pad of your trigger finger is rested on the trigger blade.
Your trigger finger should be in a position that allows you to pull the trigger backwards down the center-line of the rifle. There must be no tendency for the finger to push the trigger blade to either the left or right. The hand must be positioned so that on releasing the trigger no lifting or pulling down on the rifle occurs.
With regards to grip pressure and thumb position, this is something that comes down to a personal preference & it’s best to experiment yourself to find out what works for you.
TRIGGER PULL WEIGHT
Most guns these days have a 2 stage trigger. This type has a degree of movement before a further resistance is felt - known as the first stage. Further movement beyond this point will release the mechanism - known as the 2nd stage.
2 stage trigger mechanisms usually have adjustment for length of pull and weight of the first stage and weight of the 2nd stage. Again, the trigger weight is a personal thing but try to avoid setting your trigger too light. Very light triggers run the risk of going off before you want them, which is very dangerous.
If you have a long length of travel on your trigger’s first stage, make sure that the pad of your trigger finger is at 90 degrees to your trigger blade when the 2nd stage is reached rather than at the start of the 1st stage.
TRIGGER RELEASE TECHNIQUE
There are two main methods of trigger technique that most shooters use.
1.When ready to commit to a shot, take up the 1st stage of the trigger until the 2nd stage is felt, then gradually increase pressure on the trigger blade until the shot is released.
2.When ready to commit to a shot, take up the 1st stage of the trigger until the 2nd stage is felt and increase and decrease pressure on the trigger blade in a ‘pulsing’ motion.
Either of these methods can work, again it’s something you should experiment with until you find what works best for you. The only part of your hand that should be moving when you take a shot is your trigger finger and your trigger should be set up to give a predictable and repeatable let off point.
THERE ARE SEVERAL MISTAKES THAT HAPPEN DURING TRIGGER RELEASE:
Snatching the trigger –
•That is a very rapid buildup of pressure, made even worse if the finger takes a ‘run at it’ i.e. approaches the trigger blade at speed.
•Pulling through the first stage quickly and hitting the second stage pressure and continuing through.
•Taking up the first stage then releasing the pressure a little before snatching at the second stage.
All of the above will transmit large movements to the gun as it fires.
FOLLOW THROUGH
The aiming and firing process does not end when the trigger is released. The process of maintaining the aim during and beyond the release of the shot is called follow through.
Follow through is of vital importance, particularly in air rifle shooting, because the action of the air rifle is quite slow. The trigger dis-engages the piston sear, the piston moves forward to compress the air which is released to accelerate the pellet up the barrel before it finally leaves the muzzle and only then is it free of the influence of the shooter. During this period (known as the ‘lock time’) if your aim is disturbed you might not hit your target.
There are several physiological reasons to follow through. When your crosshairs are where you want them to be, you release the trigger but the finger doesn’t move instantly. A reaction time delay of approximately 0.3 seconds occurs before your finger moves. Through this period the aim must be maintained.
Also, the gun is held in position by some muscular effort that must remain the same until the shot has left the rifle. Without follow through there is the chance that the muscles holding the gun might relax a fraction of a second early, before the pellet has left the muzzle, moving the gun and resulting in a poor shot.
Good follow through can be obtained by maintaining the aim of the rifle for about 1 second after trigger release. This is more than enough time to allow the shot to leave the rifle. It’s good practice to try to watch your pellet strike the target. It isn’t always possible to see your pellet in flight, but if you can see where you hit or miss on the target, then this will help with wind estimation and range estimation for subsequent targets on the course.
PUTTING IT ALL TOGETHER AND PRACTICING
For trigger control and follow through, you should try to avoid shooting at out of focus targets or targets that aren’t level. When shooting from a bench-rest or from the rested prone position use something to support your rifle to make it as stable as possible – remember to concentrate only on the trigger technique, breathing and follow through.
If you use the 25 yard target set-up make sure that the target paper is level, either by using a spirit level along the top edge of the paper or a plumb line along the side of the paper. A large part of accurate shooting is being able to learn from your mistakes…
HAPPY SHOOTING!!!
Briha